> ## Documentation Index
> Fetch the complete documentation index at: https://auth0-feat-init-gt-translations.mintlify.site/llms.txt
> Use this file to discover all available pages before exploring further.
> Forms for Actions を使用して、ユーザーが新しい利用規約または同意に関する更新内容を確認して承諾できるように、更新ポリシーフォームを設定する方法を学びます。
# ユースケース: Forms を使用して更新ポリシーフォームを設定する
1. 次のスコープを有効にして、[Machine-to-Machine Application](/docs/ja-jp/get-started/auth0-overview/create-applications/machine-to-machine-apps) を作成します。
* `read:users`
* `update:users`
* `create:users`
* `read:users_app_metadata`
* `update:users_app_metadata`
* `create:users_app_metadata`
2. M2M アプリケーションの認証情報を使用して、[Vault 接続](/docs/ja-jp/customize/forms/vault) を追加します。
Forms for Actions では、カスタムのプライバシーポリシーフローを作成し、その同意内容を `app_metadata` オブジェクトに保存できます。
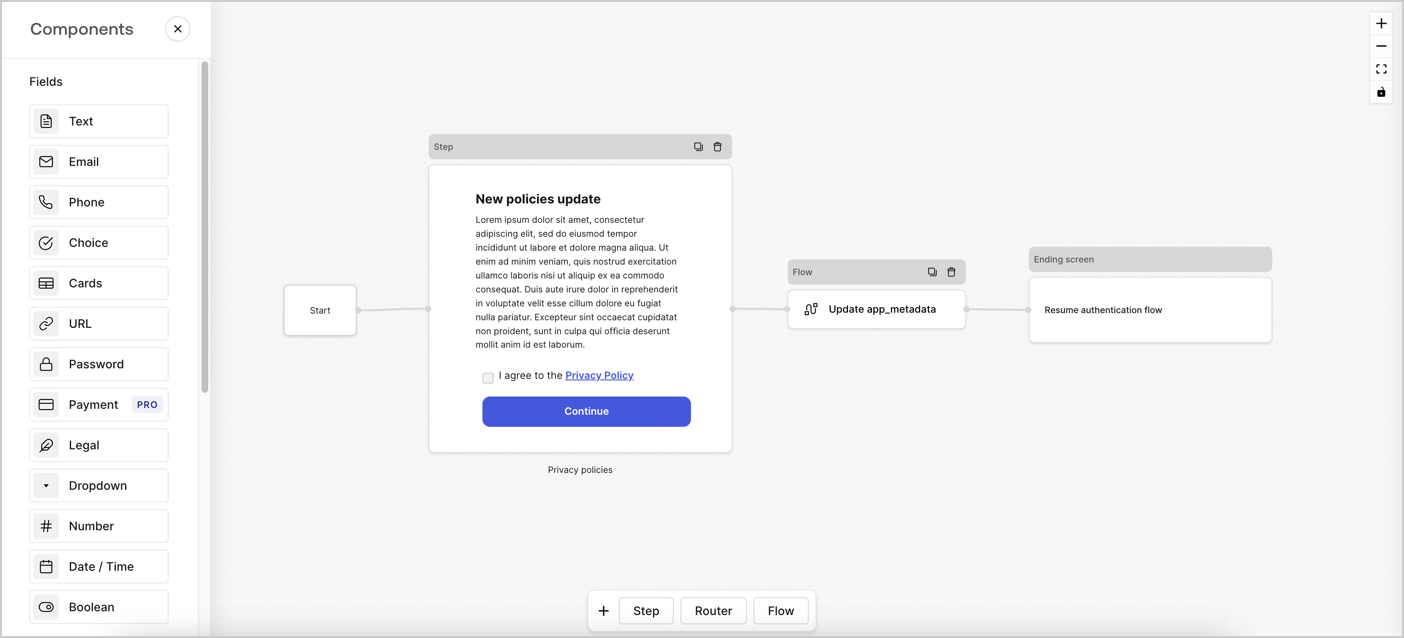 以下のセクションでは、ノードとフローを使用して更新ポリシーフォームを作成する方法と、そのフォームを [Post Login](/docs/ja-jp/customize/actions/explore-triggers/signup-and-login-triggers/login-trigger) Action に追加する手順について説明します。
情報を収集するためのフォームを作成するには、次の手順に従います。
1. **Auth0 Dashboard > Actions > Forms** を選択して、フォームエディターを開きます。
2. **Create Form** > **Start from scratch** を選択します。
デフォルトでは、新しいフォームには Start ノード、Step ノード、Ending screen ノードが含まれています。
以下のセクションでは、ノードとフローを使用して更新ポリシーフォームを作成する方法と、そのフォームを [Post Login](/docs/ja-jp/customize/actions/explore-triggers/signup-and-login-triggers/login-trigger) Action に追加する手順について説明します。
情報を収集するためのフォームを作成するには、次の手順に従います。
1. **Auth0 Dashboard > Actions > Forms** を選択して、フォームエディターを開きます。
2. **Create Form** > **Start from scratch** を選択します。
デフォルトでは、新しいフォームには Start ノード、Step ノード、Ending screen ノードが含まれています。
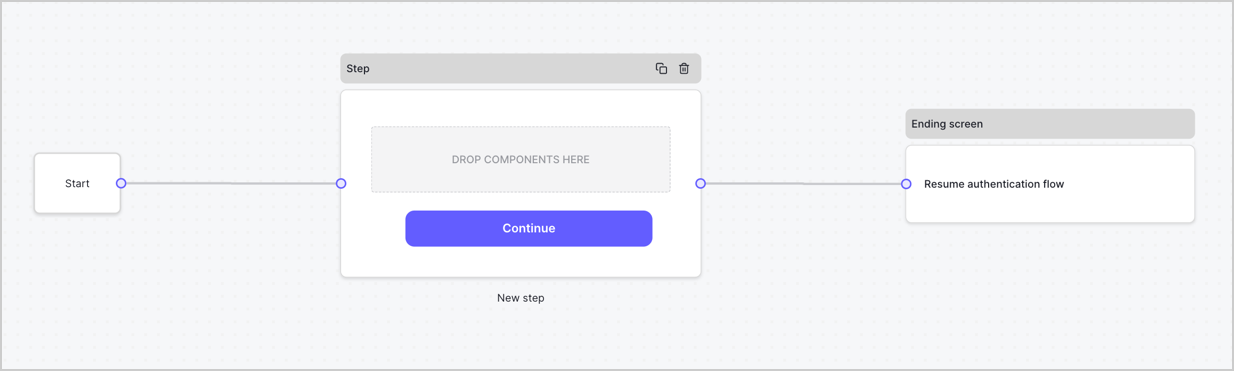 Step ノードは、ユーザーに表示されるグラフィカルインターフェースです。次の手順で、新しい同意の承諾値を収集するための [Fields](/docs/ja-jp/customize/forms/nodes-and-components) を Step ノードに追加します。
1. **Components menu** から **Rich text** フィールドを **Step** ノードにドラッグします。
* **Rich text**: プライバシーポリシーの更新内容に関する説明を入力します。
* **Save** を選択します。
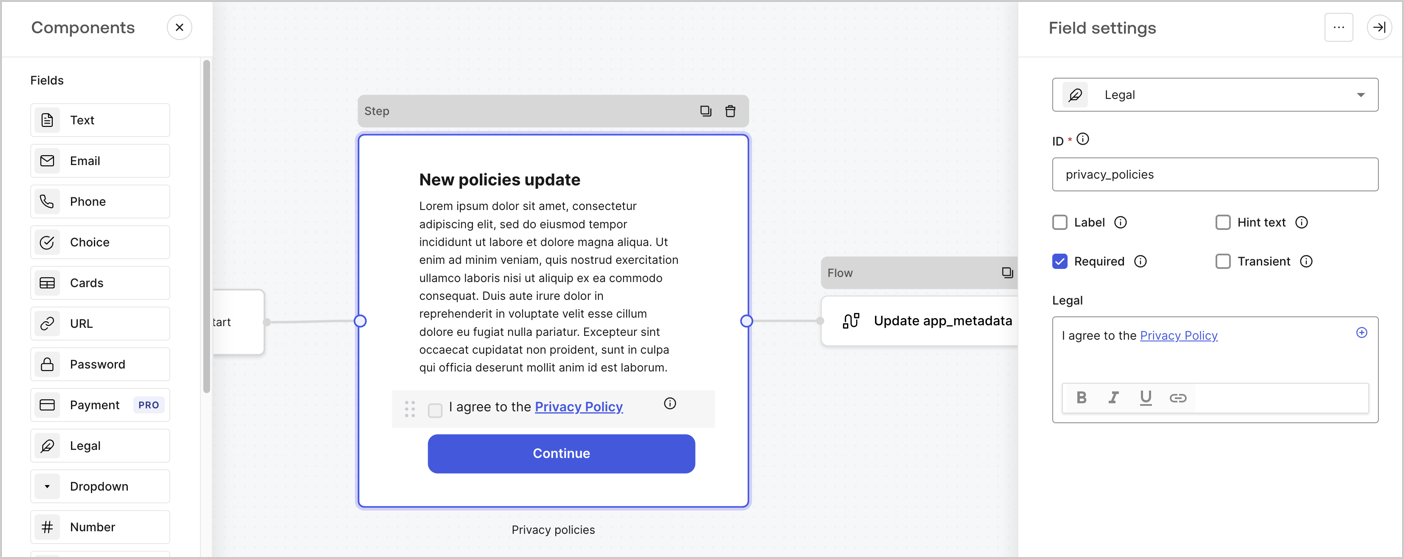
2. **Legal** フィールドを **Step** ノードにドラッグします。
* **ID**: `privacy_policies` と入力します。
* **Required**: チェックボックスをオンにします。
* **Legal**: `I agree to the Privacy Policy` と入力します。
* **Save** を選択します。
3. 保存するには **Publish** を選択します。
Step ノードは、ユーザーに表示されるグラフィカルインターフェースです。次の手順で、新しい同意の承諾値を収集するための [Fields](/docs/ja-jp/customize/forms/nodes-and-components) を Step ノードに追加します。
1. **Components menu** から **Rich text** フィールドを **Step** ノードにドラッグします。
* **Rich text**: プライバシーポリシーの更新内容に関する説明を入力します。
* **Save** を選択します。
2. **Legal** フィールドを **Step** ノードにドラッグします。
* **ID**: `privacy_policies` と入力します。
* **Required**: チェックボックスをオンにします。
* **Legal**: `I agree to the Privacy Policy` と入力します。
* **Save** を選択します。
3. 保存するには **Publish** を選択します。
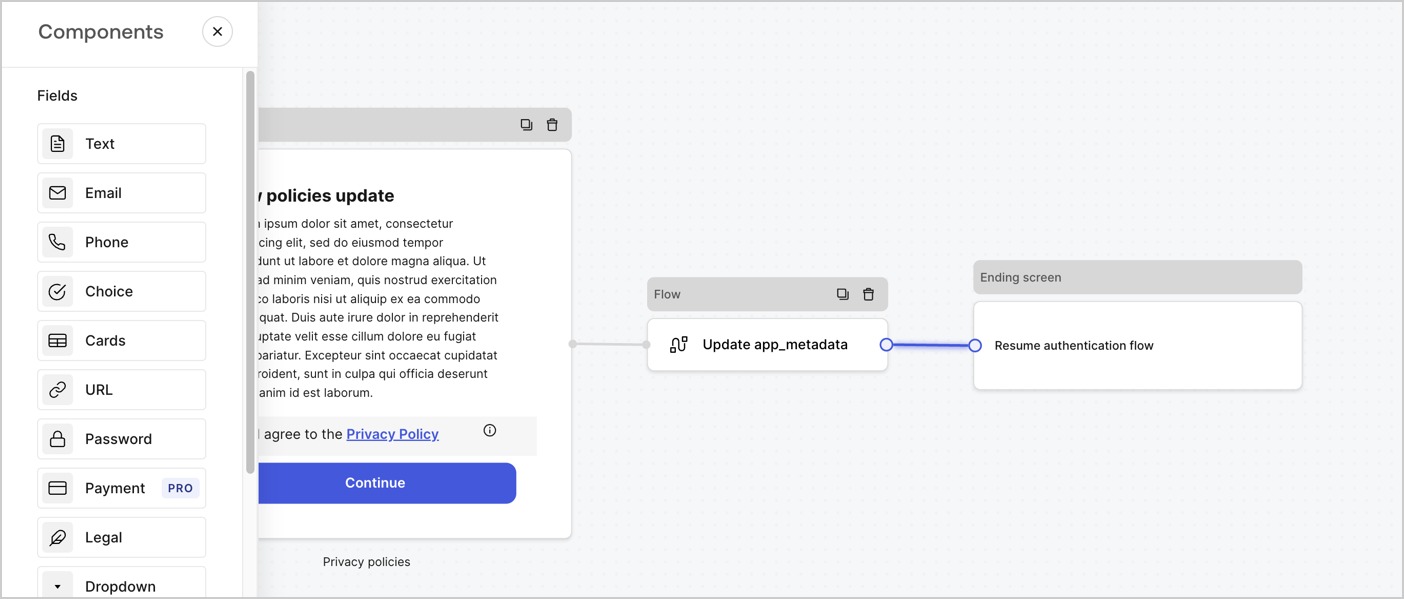
 次の手順に従って、**Step** ノードの後に **Flow** ノードを追加し、`app_metadata` を更新して認証フローを再開します。
1. フォームエディターの下部で **Flow** を選択します。
2. **Step** ノードと **Ending Screen** ノードの間にある既存のリンクを削除します。
3. 新しい **Flow** > **Click to add a flow** > **Create a new flow.** を選択します。
* **Name** フィールドに `Update app_metadata` と入力します。
* **Create** を選択します。
* **Save** を選択します。
4. 下図のように、**Flow** ノードを **Step** ノードと **Ending Screen** ノードにリンクします。
5. 保存するには **Publish** を選択します。
次の手順に従って、**Step** ノードの後に **Flow** ノードを追加し、`app_metadata` を更新して認証フローを再開します。
1. フォームエディターの下部で **Flow** を選択します。
2. **Step** ノードと **Ending Screen** ノードの間にある既存のリンクを削除します。
3. 新しい **Flow** > **Click to add a flow** > **Create a new flow.** を選択します。
* **Name** フィールドに `Update app_metadata` と入力します。
* **Create** を選択します。
* **Save** を選択します。
4. 下図のように、**Flow** ノードを **Step** ノードと **Ending Screen** ノードにリンクします。
5. 保存するには **Publish** を選択します。
 次の手順に従って、フローに Auth0 の Update user アクションを追加します。
1. **Flow** **Update app\_metadata** > **Edit flow** を選択し、新しいタブで Flow エディターを開きます。
2. StartAction の下にある **+** アイコンを選択して **Update user** アクションを追加します。以下のフィールドに入力し、**Save** を選択して続行します。
* **Connection**: ドロップダウンから、M2M アプリケーション用の Vault 接続を選択します。
* **User ID**: `{{context.user.user_id}}` と入力します。
* **Body**: 次のコードをコピー&ペーストして、privacy\_policies プロパティと privacy\_policies\_timestamp プロパティで app\_metadata を更新します。
```text lines theme={null}
{
"app_metadata": {
"privacy_policies": true,
"privacy_policies_timestamp": "{{ functions.toTimestamp() }}"
}
}
```
* **Save** を選択します。
3. 保存するには **Publish** を選択します。
次の手順に従って、フローに Auth0 の Update user アクションを追加します。
1. **Flow** **Update app\_metadata** > **Edit flow** を選択し、新しいタブで Flow エディターを開きます。
2. StartAction の下にある **+** アイコンを選択して **Update user** アクションを追加します。以下のフィールドに入力し、**Save** を選択して続行します。
* **Connection**: ドロップダウンから、M2M アプリケーション用の Vault 接続を選択します。
* **User ID**: `{{context.user.user_id}}` と入力します。
* **Body**: 次のコードをコピー&ペーストして、privacy\_policies プロパティと privacy\_policies\_timestamp プロパティで app\_metadata を更新します。
```text lines theme={null}
{
"app_metadata": {
"privacy_policies": true,
"privacy_policies_timestamp": "{{ functions.toTimestamp() }}"
}
}
```
* **Save** を選択します。
3. 保存するには **Publish** を選択します。
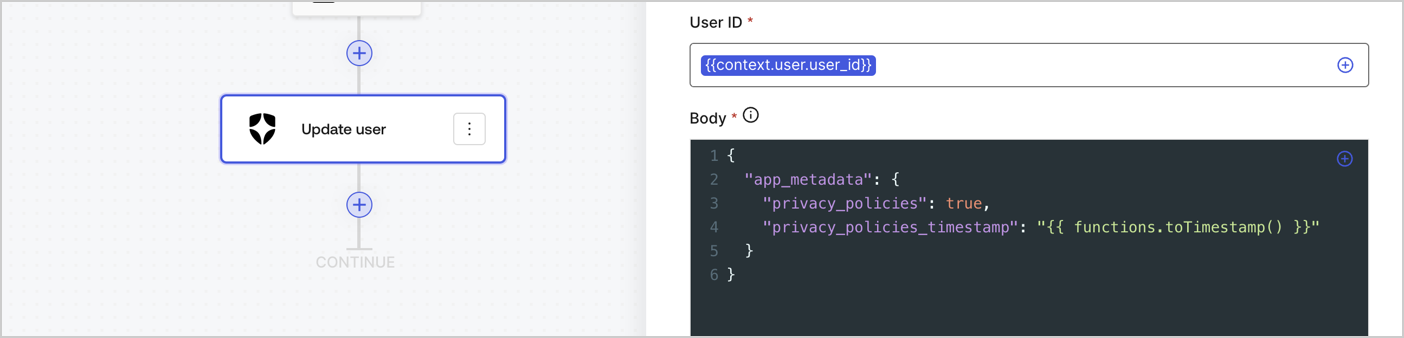 フロー **Update app\_metadata** では、app`_metadata` オブジェクトに `privacy_policies: true` を追加し、さらに [helper function.](/docs/ja-jp/customize/forms/variables) を使ってタイムスタンプを生成します。
以下の手順に従って、カスタムの Post Login Action でフォームを表示するためのレンダリングコードを取得します。
* フォームエディターで、**`<> Render`** を選択します。
* **Copy** を選択します。
フロー **Update app\_metadata** では、app`_metadata` オブジェクトに `privacy_policies: true` を追加し、さらに [helper function.](/docs/ja-jp/customize/forms/variables) を使ってタイムスタンプを生成します。
以下の手順に従って、カスタムの Post Login Action でフォームを表示するためのレンダリングコードを取得します。
* フォームエディターで、**`<> Render`** を選択します。
* **Copy** を選択します。
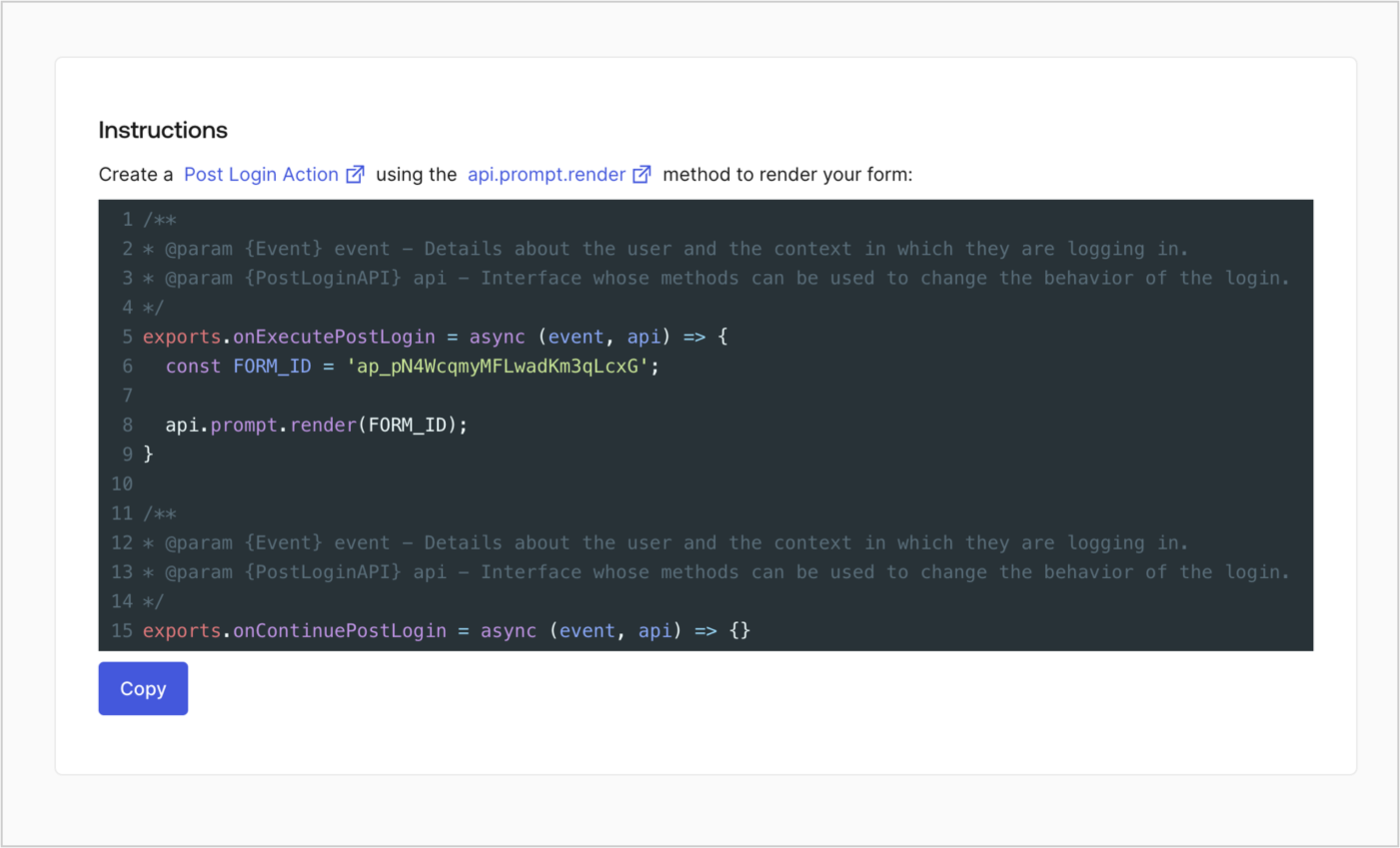
Post Login Action を作成する
次の手順に従って、フォームを表示する post-login Action を作成します。
1. **Auth0 Dashboard > Actions > Flows > Login** に移動します。
2. **+** アイコンを選択し、**Build from scratch** を選択します。
* **Name**: `Render Update Policy Form` と入力します。
* **Trigger**: `Login / Post Login` を選択します。
* **Runtime**: 推奨バージョンを選択します。
3. **Create** を選択します。
post-login Action を設定するには、次の手順を実行します。
1. Code editor 内の既存のコードを削除します。
2. フォームを表示するコードを Code editor に貼り付けます。
3. フォームを表示するための条件ロジックを定義するよう、コードを編集します。
```javascript lines theme={null}
/**
* @param {Event} event - ユーザーと、そのユーザーがログインしているコンテキストに関する詳細。
* @param {PostLoginAPI} api - ログインの動作を変更するためにメソッドを使用できるインターフェース。
*/
exports.onExecutePostLogin = async (event, api) => {
const FORM_ID = 'REPLACE_WITH_YOUR_FORM_ID';
if (event.user.app_metadata.privacy_policies !== true) {
api.prompt.render(FORM_ID);
}
}
exports.onContinuePostLogin = async (event, api) => { }
```
上記のコード例では、ユーザーの app metadata に `privacy_policies` プロパティがない場合、フォームが表示されます。
4. **Deploy** を選択します。
5. **Render Update Policy Form** Action を **Login** フローにドラッグ&ドロップします。
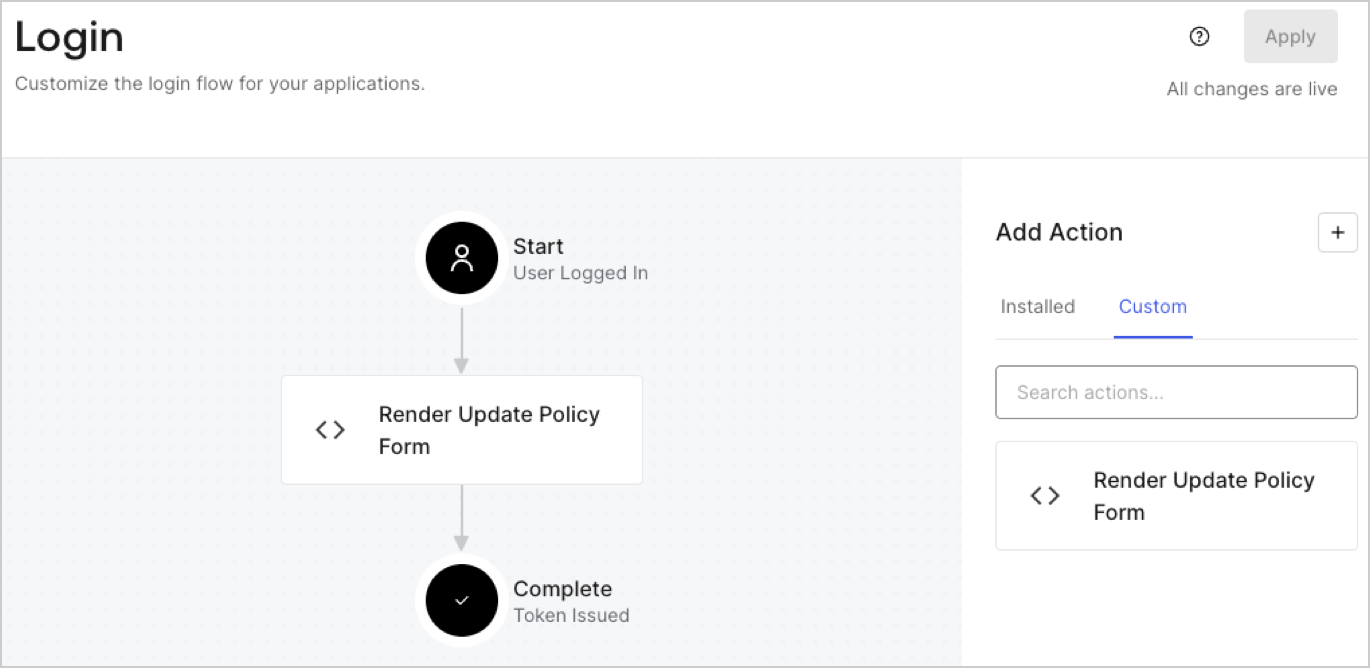 6. **Apply** を選択します。
実装をテストする
次の手順に従って、実装をテストします。
1. `app_metadata` 属性の `privacy_policies` に値が設定されていない既存ユーザーでログインします。
2. Login フロー の post-login Action によってフォームが表示され、同意を求めるプロンプトが表示されます。
3. **Auth0 Dashboard > User Management > Users** を選択し、該当するユーザーを見つけて、`app_metadata` 属性の `privacy_policies` に `true` の値とタイムスタンプが含まれていることを確認します。